24 February 2010

Upcoming Holidays

Where did February go? Now March is just around the corner and you know what that means?

MORE HOLIDAYS to celebrate!

March is going to be a very fun month since we have

Pie Day on March 14th
St. Patricks Day on March 17th
and Easter on April 4th

If you have any fun traditions for these holidays, let us know!

I will be posting some of ours in the next few days.

14 February 2010

Happy Valentine's Day

Thanks for sending in your great ideas. Hope you have a Happy Valentine's Day!

04 February 2010

How to make a Birthday Plate

Birthdays were a huge deal when I was growing up. I plan on sharing lots of the birthday traditions we had that made our birthdays special. But for today, I will share one tradition that is easy to make and will help make birthday meals that much more special. I remember my Mom making a birthday plate for us and I wanted to make one for my own family. So here is the how-to. I had lots of fun making this and am so excited to use it for my husband's birthday in March.

What you will need:
  • a clear glass plate (I got one for $.50 at a thrift store)
  • a paint brush
  • mod podge
  • birthday tissue paper. Now, good luck finding tissue paper. Our birthday plate was made out of very vibrant tissue paper that had presents all over it. I looked ALL over for birthday tissue paper and the only place I found it was Wal-Mart. It was $1 for more than you will need. If you find any other more festive tissue paper, leave a comment so we know where we can find it!

Lay out your plate over the design to make sure you have what you want showing.

Cut out a piece of tissue paper that is a few inches larger than your plate.

Lay your plate with the eating side face down on top of a canister or oatmeal container. This will make it easier to spread mod podge and keep from getting the edges messy. Then spread a generous amount of mod podge on the bottom side of your plate like this: (make sure you get it all the way to the edge of the plate)

Then lay your piece of tissue paper on top of the mod podge. Be sure to smooth out all wrinkles.

Let the plate dry completely. Then cut off the excess tissue paper.

Cover the bottom of the plate at least one more time with mod podge. Then viola~you have a festive birthday plate!

Remember--the plate is no longer dishwasher safe. After you use it, just use a damp rag to wipe off the top of the plate. Getting the bottom of your plate wet will ruin it.

You could make a generic one for all members of your family to use or make a personalized one. Seriously, this whole project cost me $1.50 and I have enough tissue paper to make at least 5 more! This could also be a fun way to take a birthday treat to someone.

Let us know if you find any cute birthday tissue paper anywhere!

01 February 2010

Groundhog Day

We will take a short break from our Valentine's Day ideas to tell you not to forget to celebrate GROUNDHOG DAY on February 2nd.

We will keep the celebrating simple by watching the comedy movie "Groundhog Day."

If you are feeling more ambitious, you could throw a Groundhog party. Here are some ideas for a party centered around whether or not the groundhog sees his shadow.

  • Make shadows of your guests profile and have everyone guess who is who
  • Decorate the party rooms like winter or spring. If there will be 6 more weeks of winter, decorate with white snowflakes, balloons, crepe paper. Don't forget the treats: white chocolate dipped pretzels or strawberries, popcorn, rice-krispy treats, or vanilla ice cream. If spring is coming, decorate in bright spring colors and have a fruit platter, or make flower cookies or cupcakes. I thought these were adorable!
Happy Groundhog Day tomorrow!

27 January 2010

Mini Kiss Cookies

Who doesn't love kisses at Valentines?

We have a recipe in my family that we call Kiss Cookies. They are SO scrumptious and are always the first to go at any family party or gathering. The only problem is, I hardly ever have Hershey Kisses on hand.

Well, I think I may have just come up with a solution. They are still just as tasty, a bit more cost-effective, and so dang cute--MINI KISS COOKIES.

What you will need: flour, salt, baking soda, margarine, peanut butter, 1 egg, vanilla, brown sugar, white sugar, and chocolate chips (Complete recipe is at the end of this post)

Stir 1 3/4 cup flour, 1 tsp. baking soda, and 1/2 tsp. salt together and set aside.

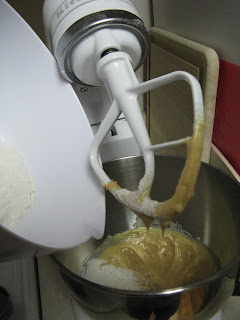
Cream 1/2 cup margarine and 1/2 cup peanut butter together.

Then gradually add 1/2 cup white sugar and 1/2 cup brown sugar. When all of that is well blended, add the egg and 1/2 tsp vanilla.
Then add flour mixture.

Roll into balls. For mini cookies, use 1/4 tsp. of dough for each ball.

Then roll each ball of dough into sugar.

And place on cookie sheet. Bake at 375 for 5-7 minutes, depending on how soft you like your cookies.

As soon as you take the cookies out of the oven, take a chocolate chip and place it in the middle of the cookie.

Let the cookies cool and you have yourself mini Kiss Cookies. Of course, you can make regular ones with Kisses.

Serve them on a platter or wrap them up for a Valentine's gift.

Kiss Cookies
1 3/4 c. flour
1 tsp. baking soda
1/2 tsp. salt
1/2 c. margarine
1 egg
1/2 cup sugar
1 tsp. vanilla
1/2 c. brown sugar
1/2 c. peanut butter
sugar (to roll the balls in before you bake)

Stir together flour, baking soda, and salt and set aside. Cream margarine, peanut butter until well mixed. Gradually add sugars, mixing until creamy and well blended. Beat in the egg and vanilla. Then add flour mixture. Roll dough into balls and dip in sugar. Bake at 375 for 5 minutes for mini cookies or 7-9 for larger cookies. Remove from the oven and quickly press chocolate kiss (or chocolate chip) on top of each cookie.

LinkWithin

Related Posts with Thumbnails